I really love shiny and smooth things.
Nothing beats shiny and smooth things.
Because they are so cool.
However, the shiny and smooth things are never within reached in my hand.
üiwith a Sighüj"Oh man, I want to build cool and gorgeous amplifiers with smooth and shiny stainless steel or a chrome plated chassis....But they are usually so expensive that I can't afford..."
One night on the New Year Holiday in 2003, I was thinking about this while I was baking ''Mochi (Japanese rice cake made of boiled rice)'' for "Nabe (sort of pot stew)" on a nickel chrome coiled heater.
Suddenly, I had a revelation. It said, "You can find what you want just around you!" I looked around and then realized that the heater I was using for "Mochi" had a very charming shape. "Yeah, it does have a shiny body and what a smooth surface it is! The label on the switch says its name 'SURE'. SURE? Wow! This must be made by a famous cartridge maker. Its V15 is a masterpiece of the cartridge. But what is the name 'Ishizaki-dennki (Ishizaki electronics)' printed on the back cover? It must be a Japanese company.... Oh, maybe 'SURE' was acquired by this company during the "Bubble Economy".... Wait a minute, spelling should be S H U R E! Then what is this? Ok, forget."
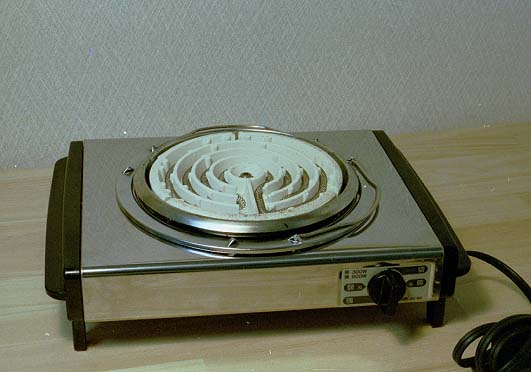
"Anyway, if I use this heater for building an amplifier, I can't bake "Mochi" next year. Moreover how could I do such a wasteful thing? But the Lord said " Built it now!". So, should I look for a coil heater around dumps (dump sites)?"
The following days, I was so interested in dumps on the way to the work. My eyes were unconsciously looking for a nice used coil heater. But all I found were kerosene heaters and kitchen stoves that were usually too large to be used for amplifiers.
"Damn! Without a coil heater, I can't start this new project forever. What shall I do? The kindergarten that my daughter goes to also uses the same route that I do when I go to work. So maybe her friends' mothers might recognize me and talk about me. "Did you see Lisa's father? He was looking for something at dumps. He looked like a hunter" Gee, I have to do something!"
Every time when I face something difficult to build amplifiers, I make a pilgrimage to the holy place for Japanese DIY tube amplifier builders. This place is of course my master's website "Tube Enthusiast".
" Well, where is the chapter for "Finding things you want from damp off site"? No, there isn't such chapter." But the next moment, I found one word "Virtual Amplifier".ü@It was a title of Mr. Bin's (not Bean's) website introduced in "Tube Enthusiast".
If I applied virtual amplifier technique, I wouldn't have to look for a coil heater at a dumps and moreover, I could build an amplifier for free! So I checked his website out. "Wow! What a 3-D!!" I was convinced that this technique was good enough. But I was still wondering why Mr. Bin created this virtual amplifier by EXCEL not by typical drawing software. So I tried drawing with EXCEL.
First I made all the cells equal sized squares so that each square represented a 10mmx10mm grid. Then I drew a rectangle and painted it over with black gradation. "Oh! It's real electrolytic capacitor! This is it!" But I thought I needed something different because if I used this technique only it would be just an imitation. One idea that came in my mind was "Photo Collage". I'll show this later.
The building plan for this amplifier was as follows
1. To save the shiny area of the heater as much as possible, minimum machining was done. No holes over 4mm diameter were allowed. Instead of the ceramic part to embed the coiled heater, it was removed and an aluminum plate was attached.
2. Since I had transformers from the 6BM8, which was used for the Kha-Tar#1, the same STC amplifier was built again. However, to save space on and inside the chassis, (1) the FET 2SK30As that are much smaller than the tubes were used as a first stage amplifier (2) the 50BM8s were used instead of the 6BM8s in order to omit the heater transformer. (3) one output transformer was used per channel although the original schematics used two per channel.
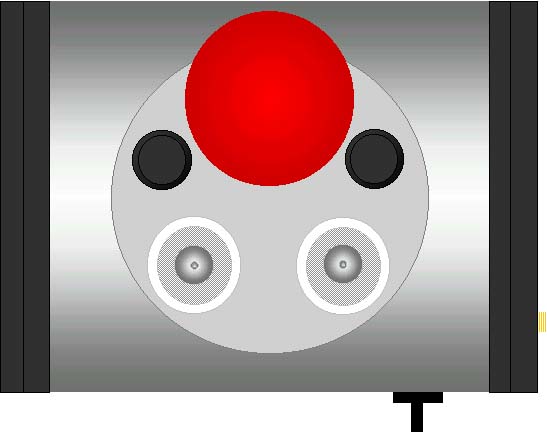
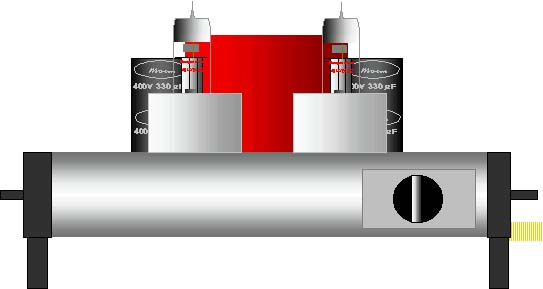
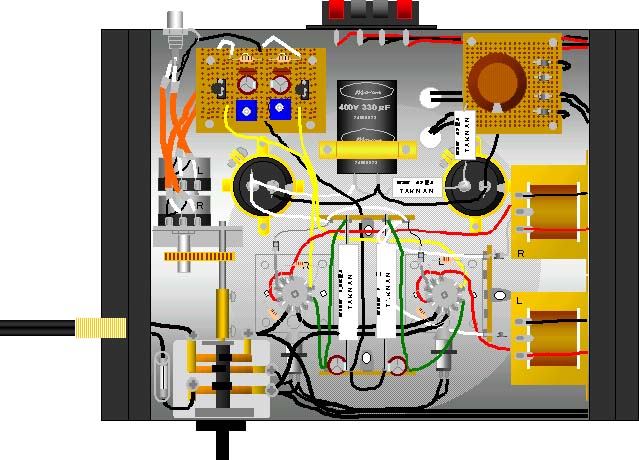
Under this plan, I first had the parts layout for the top part of the chassis. The power transformer, which is too big to arrange inside the chassis was placed in the center of the top chassis with the 100yen cover used for the "Kha-Tar#1".Two of three electrolytic capacitors for the rectification, 330ā╩F 400V, were arranged on the top chassis. The other one was placed inside the chassis. For decoration purposes, the soy sauce pot light up system, which was successfully introduced in the "Kha-Tar#2", was used again. But this time a neon light was used instead of a blue LED.
OK, let's start the "Photo Collage"!
First of all, arrange all parts such as the transformer and the vacuum tubes on the coil heater then... "big smile!" "Click!"
The next step is to modify the pictures by "Photo Shop". Oh oh, I've taken pictures without arranging the capacitors. But no problemo! It's easy! Just draw the capacitors by EXCEL then cut and paste! Finally, to make the heaters and neon lights work I changed colors. "Wow! What a reality!"
(It looks easy. But without a digital camera, this process is actually a little bit troublesome)

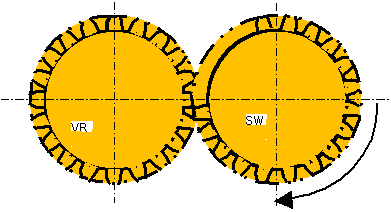
Now, let's move to the parts layout inside the chassis. I wanted to leave the rotary switch that selects heater combination (off->inner coil 300W->both coils 600W-> outer coil 300W) and reuse it as a switch that can control power switch and volume. It might be easy if I used a unified volume and switch. But I didn't want use this type of volume because if I used this, the input signal line and the power line got close and it might be a cause to a hum. To separate switch and volume, I first thought to extend the shaft of the switch and join to the volume. But I realized it is difficult to satisfy the function, that was first 90 degrees rotation makes power on then rest of the rotation makes volume up and down. So I rearranged the switch and volume so that each shaft became parallel and intermittent gears shown in the picture drove them.
Based on these plan, I draw a front view and top view of the amplifier by EXCEL.
"Man! Drawing the detail of the 50BM8 is difficult!" After all parts were arranged nicely, let's move to the wiring! Because of the virtual process, no mistakes due to the poor soldering were expected. No third hand to hold part was needed (as you know we wish three hands for soldering, one is for a soldering iron, one is to hold a wire, and third one is to hold a part). It's stress free! I spent only two hours for the wiring. After checking the wiring, I simply switched on. No smoke showed up. No noise was heard even if I brought my ear close to the speaker! Then I played Bach's "Cello Suit" on CD. What a wonderful sound! (Sigh)
-- Fine--
Kha-Tar #4 The Final Frontier
After having a revelation, there was another thing that I had been in my mind. That is an oven toaster like this picture. Unfortunately, mine is not a shiny body as you see. But I found that the maker has a shiny type. So I started to build the "Kha-Tar #4" immediately.
ü@ü@ü@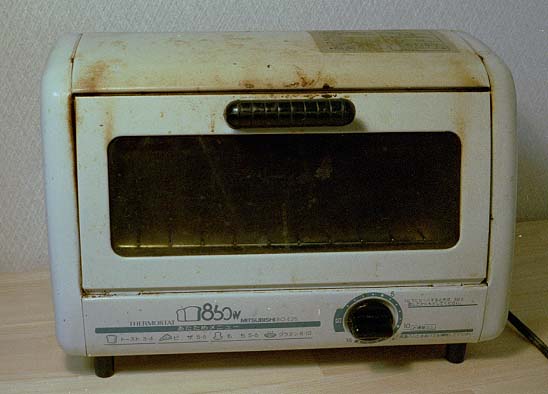
Because of the virtual world, any parts are free! This time I used the same schematics as the "Kha-Tar #2", that is EL34 STC amplifier. I used the Matsusita's EL34. It's about 10,000 yen per tube! Moreover, I used the TANGO's output transformers XE-20s. It's 19,800 yen! What a gorgeous parts they are! I wish this project did not finished as a virtual one. By this moment, a frustration absorbed all my DIY energy and I couldn't go any further.
ü@ü@ü@ü@ü@Kha-TaréSŹåüiāgü[āXāgéŁé±üj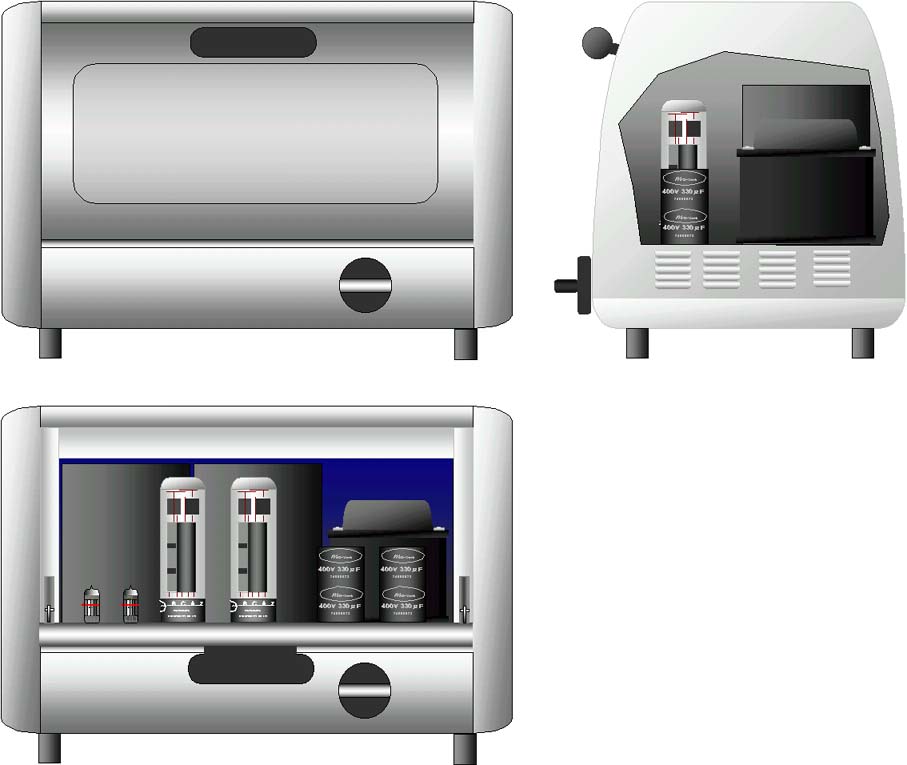 ü@
ü@
The Future Plan
ü@In the next project, I would like to build an amplifier with schematics designed by myself. Actually, I've already bought power tubes. But I'm broke now.
WARNING!! Tube circuits contain high voltages and are dangerous to work on! Do not attempt to build any of these designs if you are not qualified. The author is not responsible for personal injury or property damage caused by use of the information on these pages.
GO TO PART IIIhome