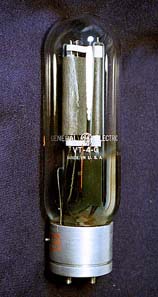
What made me restart building tube amplifiers after twenty-five years? Well, I'm not sure. But one reason might be one website, 'Tube Enthusiast', made by my high school predecessor stimulated my sleeping tube DIY (Do It Yourself) spirit. Anyway, in April 2002, I was in Akihabara, a huge 'Everything for Electronics' city. The thing I bought on impulse, spending all my pocket money, was a pair of GE's VT-4C. I didn't have any plan to build a VT-4C amplifier because it requires about 1KV plate voltage. Moreover, how can I afford transformers for them???
The biggest reason I bought in spite of these limitations was that I had longed for a VT-4C since I was a junior high student. In the DIY tube amplifier magazine, a picture of a VT-4C had an outstanding 'Force' that pulled me in. No other tubes had ever had such a strong 'Force', even the 300B or the 845. Another reason was that the VT-4C I bought was the same age as mine. It was produced in 1959.
OK, I have a VT-4C. I will endeavor to save my pocket money maybe for the next 10 years for this big project. But I wanna build an amplifier NOW! I first thought this strong desire couldn't be satisfied because even the normal tube amplifier needs transformers that would cost more than 30,000 yen (=$300). But one day I happened to find a 'Handmade Amplifier' website. One of the projects, titled "Building STC(Super Triode Connection) amplifier within 20,000 yen", completely blew away my fixed idea about the cost of transformers. 'Output transformer for only 850 yen!! Power transformer 2,000 yen only??? Are you sure??? Unbelievable!'
In the end of June, I was again in Akihabara holding two ten thousand yen notes firmly.
Because I have just started to pay for a mortgage, even 20,000 yen is very valuable to me. So I would like to enjoy the building process of an amplifier as much as possible. Since I'm a beginner, I can't design or modify amplifier schematics yet. So what I did was to decorate an amplifier.
In recent tube amplifiers we can find conventional styles that are designed for an effective signal flow and as a result they have a kind of functional beauty. We can also find more artistic ones that treat tubes like an objet d'art. Their styles are very impressive and more futuristic than transistor amplifiers. Of course, they are usually expensive and I can't afford them. But maybe I can enjoy a taste of a cool design by decorate my DIY tube amplifier with inexpensive materials. Here, I would like to show two projects done with this idea. Although the amplifiers I built might be just for self-satisfaction, I enjoyed them very much.
(1) Schematics
The schematics I used was the same as Mr. Yamada's original "limited budget (20,000yen)" type 6BM8 STC Amplifier. I also used Mr. Uda's schematics so that I could upgrade the first stage amplifier from the FET (2SK30A) to the 6AK5 with a few modifications. Mr. Uda is also a member of "Hand made amplifiers" as Mr. Yamada.
(2) Parts
I bought every part very stingily. As a result, the total cost including parts for the upgrade was a little more than 20,000yen. The only extravagance were the main tubes. I bought Amperex's 6BM8. They were 3,000 yen, a little bit more expensive than Russian made tubes or tubes by other makers. I really wanted to use an aluminum volume knob to make a cool impression, but because of my limited budget I gave up and bought a plastic knob instead.
(3) Chassis
The chassis I bought was a box type aluminum chassis. The size was (w)350x(d)150x(h)60mm. I first thought to paint the chassis with a cool color but it seemed that I had to paint in at least three different steps (primer, color coat, gloss coat) and to prepare painting materials, it would cost too much. So I didn't paint. Instead, I tried a "hairline finish" with sand papers. But it ended up terrible! I shouldn't have done anything. For drilling holes, I bought five drill bits for 100yen at a "100yen shop". (The 100yen shop is now very popular in Japan. You can buy a wide variety of stuff for only 100yen.)
(4) Assembling and Wiring
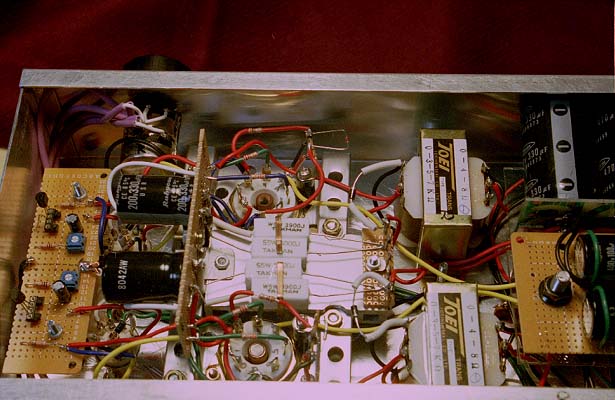
The next steps were assembling and wiring. The parts layout is very straightforward. I chose a simple layout so as to realize a smooth signal flow. This made wiring easy and hum free.
(5) Check, Adjust and Listen
After double checking my wiring, it was time for the smoke test. I switched it on with my glove protected?-finger. No smoke showed up. Then, I adjusted the cathode voltage and played a CD. The sound was clear even though my speaker system was cheap. All right!
(6) Decoration
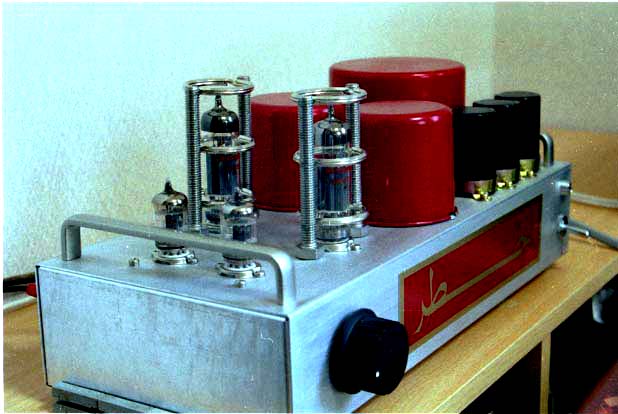
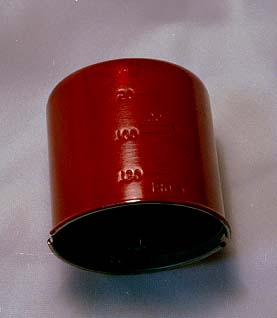
The final step was to decorate the amplifier to look cool. This time, it had two cool items. They were the transformer covers and the tube protectors.For the transformer covers, I looked for metallic covers. The first candidate that came up in my mind was an empty can. But the brim part of the can didn't look nice. So I walked around 100yen shop looking for more suitable covers. What I found was a stainless steel measuring cup for rice (rice is our staple food) and an aluminum flowerpot cover. I used a measuring cup for the output transformers and a flowerpot cover for the power transformer. I also bought door handles to be used carrying handles at a 100yen shop. The total expense was 500yen. Cheap isn't it? I painted these covers in metallic red. The paint I used was craft paint and it was a very small size (10mL).
Because the transformers I used have naked terminals I laid out a plastic sheet inside the covers for insulation. The plastic sheet was cut from a plastic bottle.
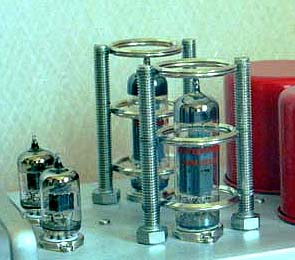
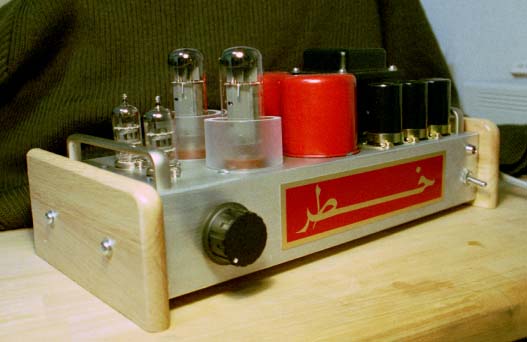
The next item was a tube protector as you can see in the picture. It has three rings supported by two bars. Actually, it was difficult to find suitable sized rings. I couldn't find a nice ring at a 100yen shop. So I looked for them at a DIY shop. One candidate was a curtain rail. Although it had a good sized ring that fit the tubes, it was made of wood. What I finally found was a key ring. It cost only 150 yen for three rings. I attached them to two 8mm bolts by epoxy glue. The picture below is the final appearance of my amplifier. Isn't that cool? The red metal plate between the switch and the lamp is a metal sticker that I bought in Jordan. It says "Danger (kha-Tar) " in Arabic. So I named my amplifier "Kha-Tar #1". What a cool name for it!
At the end of August, I was in Akihabara (again?) The main purpose this time was to fix my damaged CD player. If I had had my CD player fixed by the maker it would have cost 10,000yen. So I decided to fix it myself. Fortunately, I could find a driving belt that fit my CD player and it only cost 150yen!
This made me very happy and then, I had a good idea but the devil and the angel were fighting. " I saved 9,850yen! So I can use this money for something I want." What I bought with this money was a pair of Svetlana's EL34(6CA7).
To tell the truth, the EL34 is also my favorite tube since I was a junior high student. It has more refined shape and a better impression than the 6L6 or the 6GB8. But I've never built an amplifier with the EL34 because I couldn't afford the transformers for it.
Since there are many examples for the EL34 STC amplifier, I decided to remodel Kha-Tar#1 into the EL34 STC amplifier after I saved enough money for a power transformer.
I had seen a very cool amplifier for EL34 shown in a Japanese audio magazine. Though it has an usual parts (transformers and tubes) layout, the four EL34 tubes were covered with a glass tube and it seemed they were lit up. (Because of the black and white picture I couldn't tell the detail) It was such an impressive design that it had stuck in my mind. So in the "Kha-Tar#2", I thought I would try this design and started working out an idea.
(1) Schematics
Again, I used Mr. Uda's schematics. (Though I'm a beginner, I feel his schematics seems reliable and well designed) The first stage tube is pentode section of 6U8A. Its triode section is used as a voltage feedback. The FET, 2SK30A, is used as a plate-cathode feedback.
(2) Parts
The Siemens's 6U8A was 500yen. I wonder if it's really Siemens's because the label printed on the tube disappear when I rub on its surface. Since this project was a remodel of Kha-Tar#1, only the power transformer was a big expense. Although the EL34 eats about 100mA each and I wanted to use a DC200mA power transformer, I bought a Kmb240F(Kasuga Musen Henatsuki) due to my budget limitation. It has about DC144mA power and cost 5600yen. I used the same output transformers as Kha-Tar#1 because their rated current is 70mA and two transformers simply doubled. (Kha-Tar#1 used two output transformers per channel) And finally, the LED to light up the tubes. I bought two blue LEDs without any hesitation.
(3) Chassis
There were a few modifications from the Kha-Tar#1 to the Kha-Tar#2.
(i) the power transformer
(ii) the MT sockets for the first stage tubes
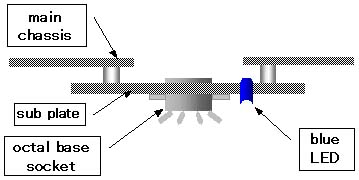
(iii) the Octal base sockets for the EL34.
The biggest modification of the three was the octal base sockets for the EL34. To get an efficient heat radiation and to light up effectively, the socket was fit on a sub plate below the main chassis as shown in the figure.
(4) Decoration Item
There were two decoration items. One is of course for the light up. The biggest difficulty I had was to find a glass tube to light up indirectly. I first thought to make the glass tube by cutting a bottle. But I didn't remember how to cut a bottle clearly. So I gave up using glass tube. The next candidate was a plastic tube. It is easy to buy acrylic tube at the DIY shop but it cost expensive.
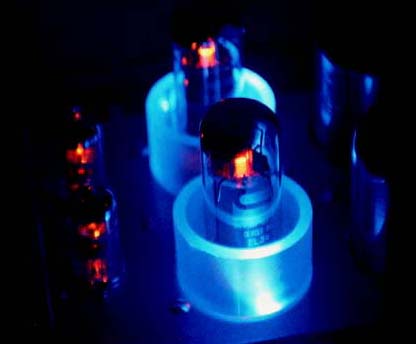
 Then a great idea flashed in my mind. I bought two soy sauce pots like the ones shown in the picture at a 100yen shop. They were made of polystyrene. The heat resistance is up to 70dgrees Celsius. I cut them about 3cm in height so that the EL34 was surrounded only on the lower part. This allowed for visual enjoyment to both the LED and the heater.
Another decoration item is a wooden plate fit on both sides of the chassis. I failed a "hair line finish" in "Kha-Tar #1" and I left the chassis without any repair. So this time I decided to decorate in some way. The wooden plate I used was a small cutting board made of rubber tree. Again, I bought it at a 100yen shop. I cut it half and fit on both side of the chassis.
(5) Check, Adjust and Listen
The "Kha-Tar #2" was more impressive than the "Kha-Tar#1". The light up was more romantic than I expected. The blue light from the LED and the orange light from the heater are well balanced as you see in the picture.
WARNING!! Tube circuits contain high voltages and are dangerous to work on! Do not attempt to build any of these designs if you are not qualified. The author is not responsible for personal injury or property damage caused by use of the information on these pages.
GO TO PART II